Nondestructive Onsite Grade Verification for Trenchless Applications
Trenchless methodologies represent an innovative and critical approach for the safe and effective management of pipeline infrastructure. The uptake has required collaboration between research firms, contractors and pipeline operators working together to advance a multitude of technologies.
Both the ABI® test method and overall speed of the technology allows operators to realize significant savings and safety advantages over conventional destructive testing costs. Our technicians are trained and certified to provide testing services on in-service pipelines and pressure vessels.
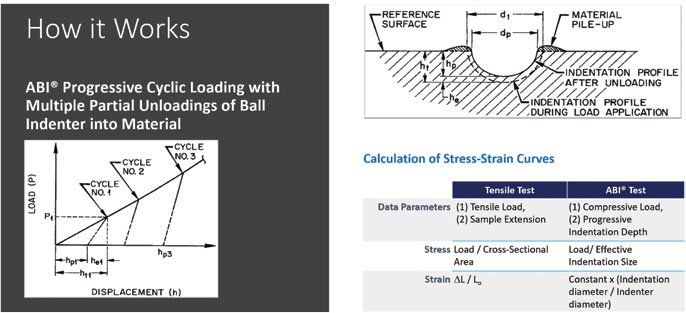
ABI® provides a nondestructive measurement of tensile properties and fracture toughness that eliminates the need to cut
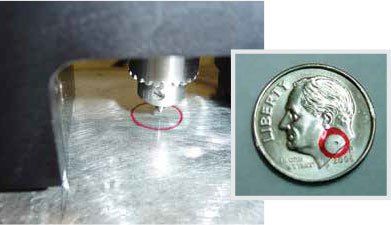
any samples. In fact, our ball indentations are shallow, with smooth edges and produce compressive stresses in the material that retard crack initiation.
The indentation is shown to scale on a dime. Each test is performed in under five minutes (three tests per location are recommended to determine average values and their standard deviations) and measure the following key mechanical properties:
• Yield Strength
• True-Stress/True-Plastic Strain Curve
• Strain-Hardening Exponent (n
• Strength Coefficient (k)
• Uniform Ductility
• Ultimate Strength
• Initiation Fracture Toughnes
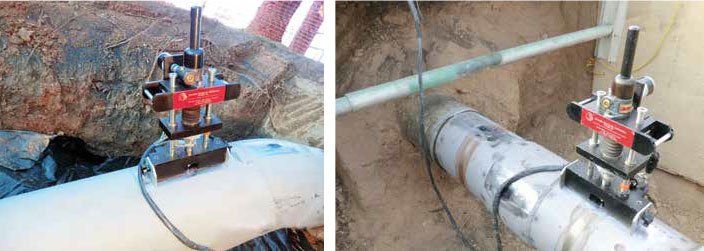
ABI® is an ideal technique for measuring material properties – tensile and fracture toughness - quickly and nondestructively. The testing system can be lowered into and pulled out of the keyhole in less than an hour and immediately provide the data and results needed.

ADDITIONAL VALIDATION
In 2007, Shell Pipeline Company sponsored a Pipeline Research Council International (PRCI) report that complemented their internal validation efforts. BP supplied data on tank steel that was also tested for before the publication. This 94-page report, titled “L52280 In-Situ Measurement of Pipeline Mechanical Properties Using Stress-Strain Microprobe – Validation” is available through www.prci.org. In the report, materials are tested at varying temperatures with consistent data integrity – “an appropriate and relevant amount of data from the nondestructive Automated Ball Indentation® (ABI®) tests and the destructive tensile and fracture toughness tests provides reasonable statistical data sets to establish the validity and accuracy of the ABI technique which produces both tensile and fracture toughness properties from each single test.” The ABI® Standard Test Method and its precision values from a 6-lab Round Robin (ILS) study is included on pages 36-60 of the report.
When applied to in-service pipelines, the test can provide considerable savings because operators are able to quickly close the excavation. And when timing is coordinated across contractors, some operators have been able to open, test, and close up to 12 locations in one day using only one testing team.
SYSTEM PLACEMENT WITHIN KEYHOLE
There is a minimal amount of space required to conduct a test – a 14x4-inch surface area is needed for the magnets to affix to the outer pipe surface. The coating must be removed for the magnets to properly operate, but only a 1 x1-inch surface area requires a white finish polish to conduct the test (using a 220 grit polishing disk). The surface does not need to be flat, only smooth. The resulting ball indentation does not need to be buffed out afterwards because it creates a spherical indentation that is akin to shot-peening (an application commonly used in the aerospace industry and plane fuselage to prevent fatigue cracks). The system is attached/connected to the electronics/control cabinet via protected cables that can extend up to 30 feet so key-hole depth is not an issue when testing.
DETERMINING MAXIMUM ALLOWABLE OPERATING PRESSURE (MAOP) WITH VARYING WALL THICKNESS
Smart-pig MFL tools and nondestructive ABI® testing are complementary. A salient example is a run that discovered a
50-foot pipe joint (12-inch outer diameter) with a reported wall thickness of 0.281 inches while the rest of the pipeline had a
wall thickness of 0.312 inches of Grade X52. It was obvious that the uniformly reduced thickness was not due to corrosion but, most likely, because the original joint was replaced due to severe localized corrosion (the pipe joint was in a swamp area).
The ABI® tests determined and confirmed that the joint met Grade X65 for the mechanical properties’ requirements so the
maximum allowable operating pressure (MAOP) of the line did not need to be lowered since the increased Grade of X65 (instead of X52) compensated for the reduced thickness. The MAOP is a function of three parameters (specified minimum yield strength “SMYS” x wall thickness / pipe outer diameter), in addition to the various mandatory factors of safety.
PREVENTING A TANK FRACTURE WHEN INSERTING A NEW NOZZLE
Another application for ABI® has been to determine the fracture toughness of a storage tank wall before cutting a plug for a new nozzle/outlet fabrication to ensure no brittle fracture could occur during the modification. ABI® testing has been able to measure tank wall mechanical properties to achieve modifications safely. The software calculation provides instant information, so it is particularly useful when trying to avoid additional asset damage.
DOES INTERNAL PRESSURE OF AN IN-SERVICE PIPELINE AFFECT THE ABI® TEST RESULTS?
A common question is whether internal pressure of an internal pipe can impact the test. The good news is that internal pressure or hoop stress condition creates only elastic stress on the internal surface of an in-service pipeline. The maximum allowed hoop stress cannot produce yield strength of the pipe in order to avoid pipeline bulging and any potential failure. Hence, the elastic stress (which is lower than the yield strength by the margin of safety used in the MAOP) cannot affect the test results of the ABI® test.
CONCLUSION
As we move out of this pandemic era into increased focus on compliance and achieving safe, cost-effective solutions, technology adoption will be critical for our industry. As operators assemble their plans for the coming decade, we look forward to continuing partnerships with both operators and contractors in advancing cost-effective and technically sound and accurate solutions. While the technology described has been used and validated numerous times over the years across multiple industries and used in over twenty countries, there is still expanding opportunity for continuing to provide value as the PHMSA Mega Rule takes effect.
- +1 (202) 350-1456
- 9306 Wild Black Cherry Ct
- www.abitesting.com/


